
Working with spreadsheets can be a bit tough, especially when it comes to integrating with other tools. Baserow lets you sort your data neatly, and it feels like using a spreadsheet. But Baserow is way stronger than a regular spreadsheet and can manage more data. Baserow makes authentication easy and secure for seamless integration with third-party applications.
In this blog post, we’ll walk you through the step-by-step process of setting up automation using Integromat to create rows in Baserow and populate multiple select fields with predefined values. With just a few simple configurations, you’ll be able to automate repetitive tasks, eliminate manual data entry, and ensure consistency in your data management processes.
What we’ll do
In this tutorial, we’ll dive into how Baserow integrates seamlessly with Integromat to automate the process of creating rows, specifically focusing on populating a multiple select field with values. We’ll cover the following steps:
- Set up your Baserow database and configure table structure
- Create a database token in Baserow
- Reference the database API documentation
- Understand Baserow format for a multiple select field
- Build the scenario in Make
- Add Baserow module to create new rows
- Use array functions in Make to transform array data
- Test and schedule the Make scenario
Prerequisites
To complete this tutorial, you’ll need the following:
- A Baserow account.
- Access to a Baserow workspace and table.
- Knowledge of Make, an automation tool that lets you connect different apps and services to automate workflows and repetitive operations.
Let’s explore how to do just that.
Populate multiple select fields via automation
1. Set up database and configure table structure in Baserow
Log in to your existing Baserow account or create a new account if you don’t have one already.
Once you log in, you can access the dashboard to add workspaces and databases. You can work with an existing workspace, database, or table, or set up a new workspace from scratch.
In this tutorial, we will set up a new workspace and create a database from scratch.
If you’re just starting with Baserow, we recommend you read our support article on how to create a workspace and how to add collaborators to a workspace.
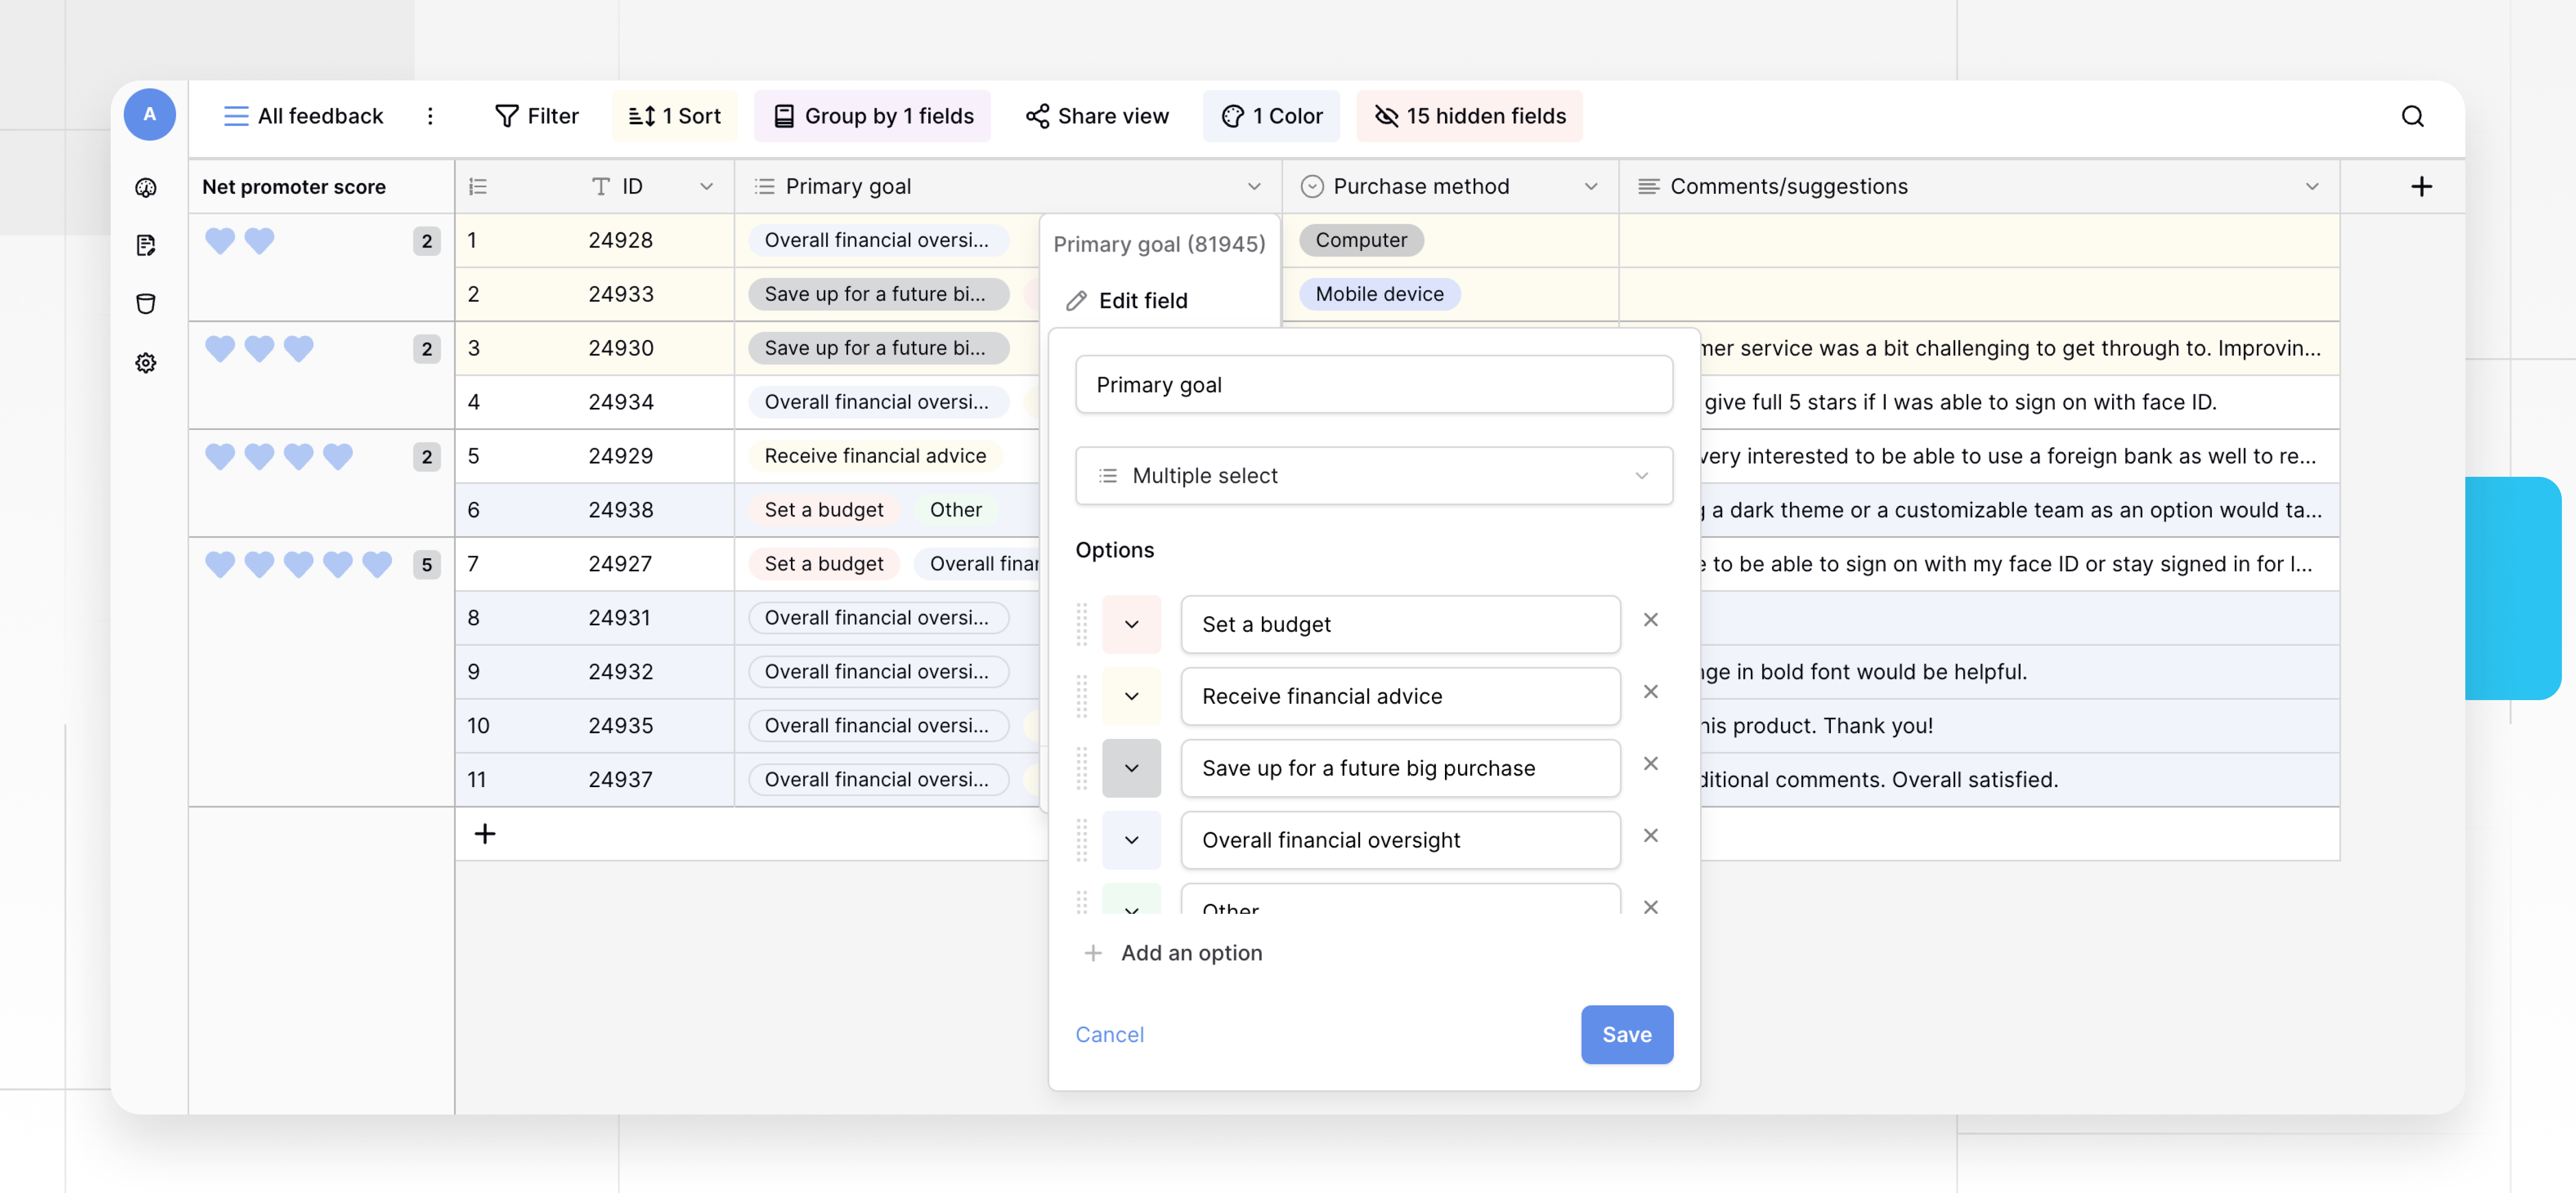
The database will contain the table we need. In this case, we have a table with a multiple select field in this Feedback submissions table.
That’s it! we’ve successfully created a new database. Now we can populate, manage, and organize data in Baserow.
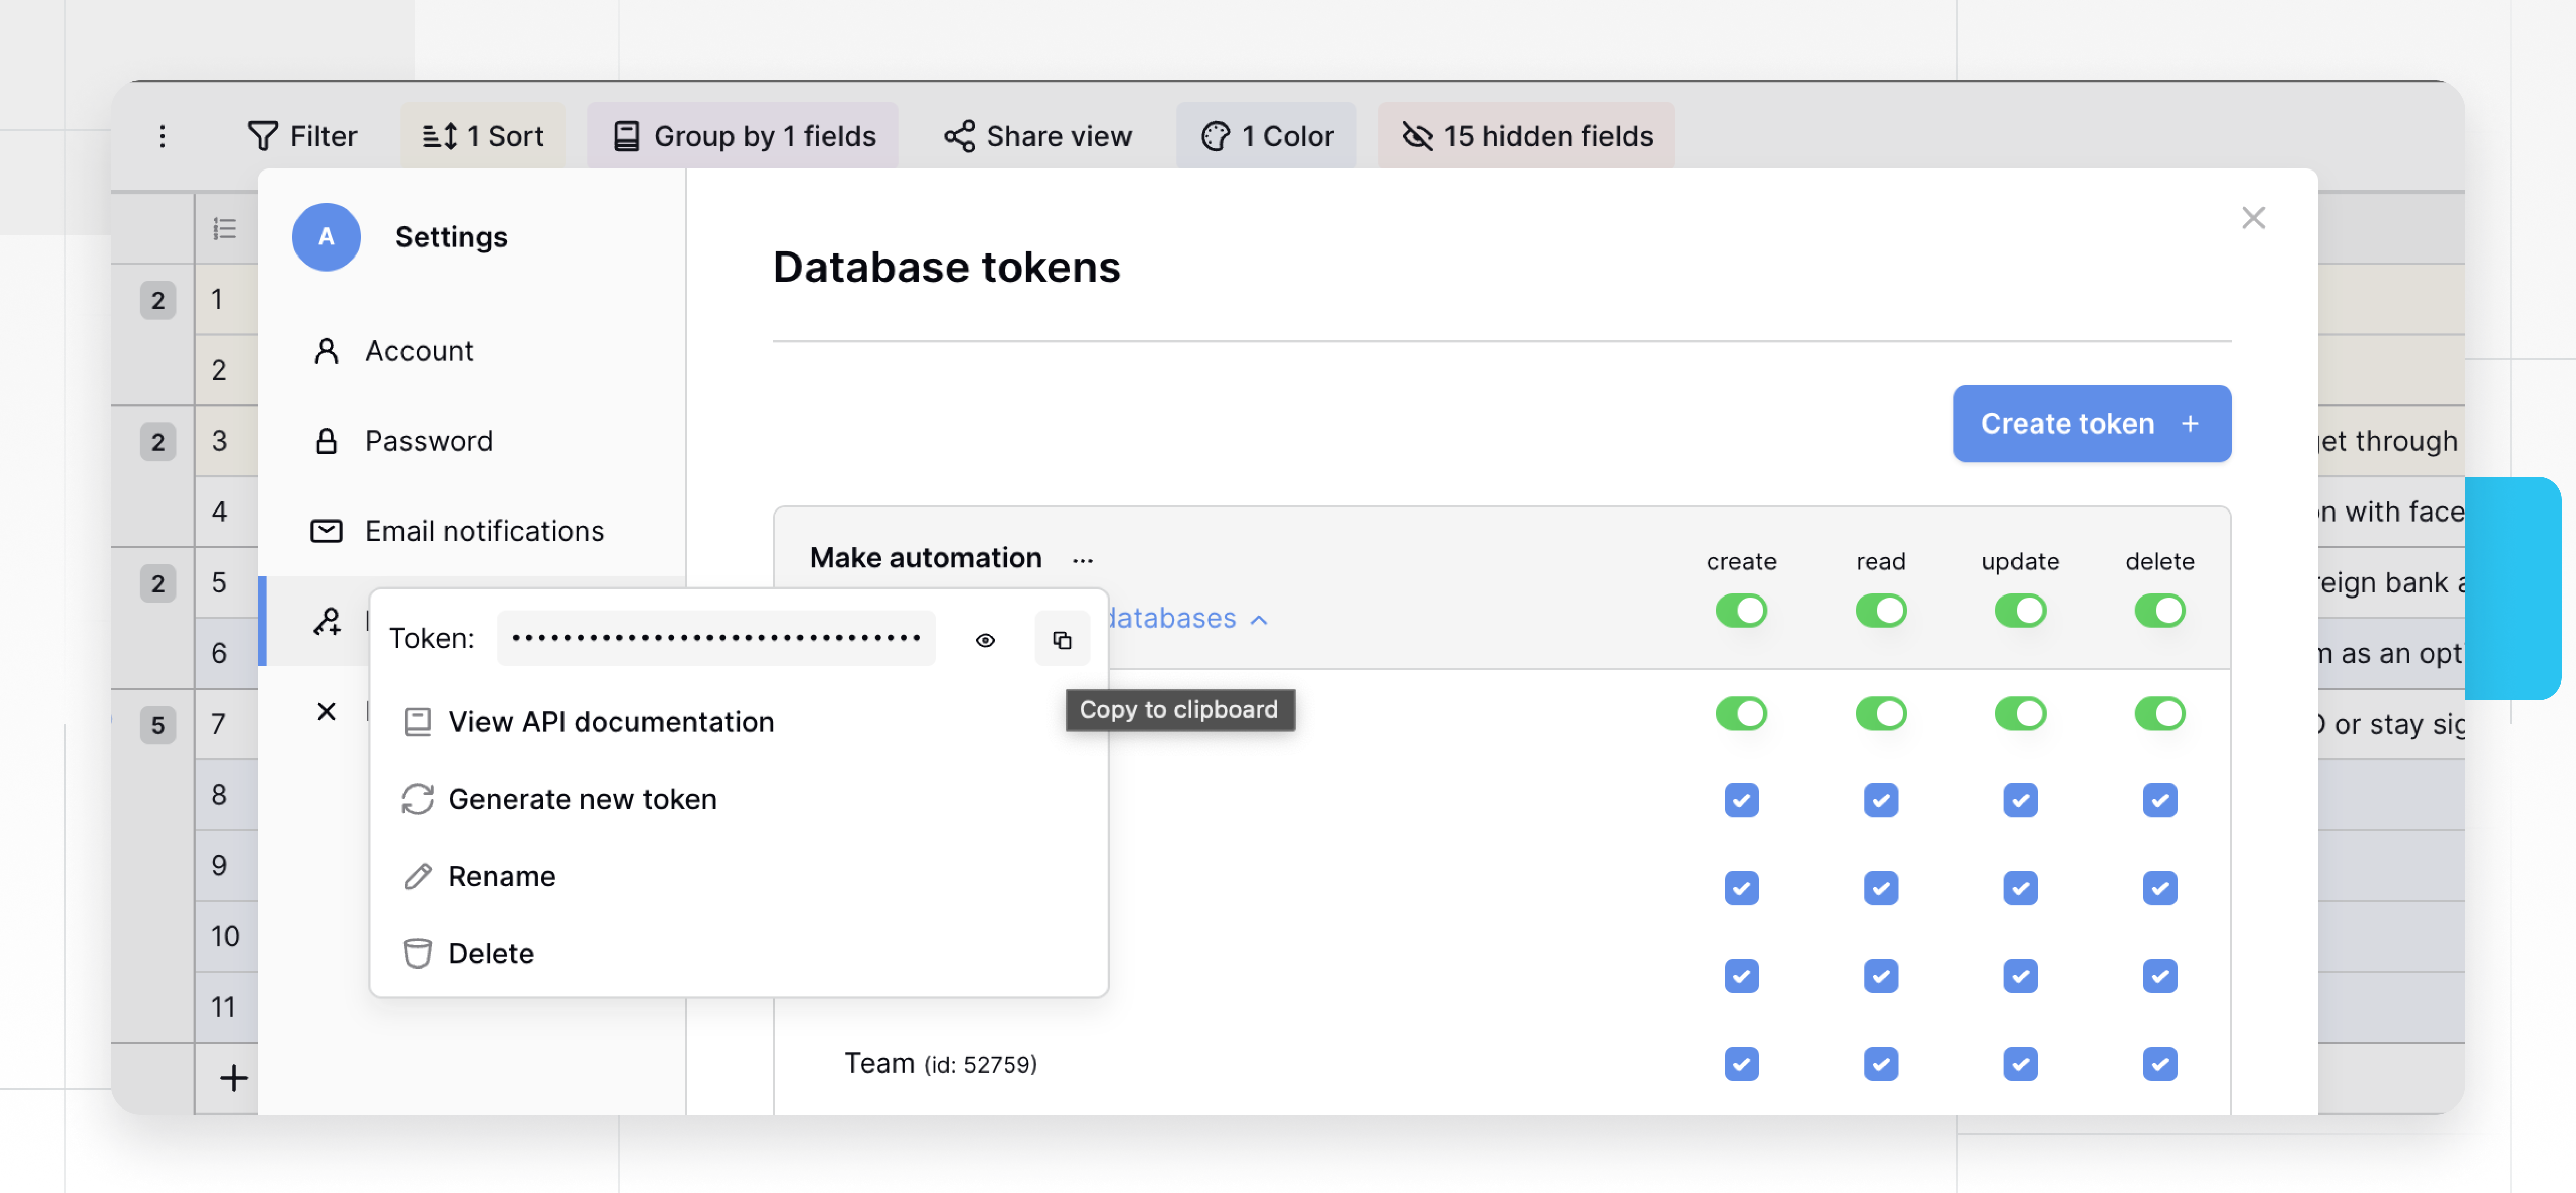
2. Create a database token in Baserow
To access Baserow data externally, we’ll need to generate at least one database token. These tokens can grant specific permissions to create, read, update, and delete data up to the table level.
Within your Baserow user account, you can create multiple unique database tokens that allow Baserow to connect with other apps. You can create and find the database token under your account settings.
Go to your profile → Settings → Database tokens → **Create token. Select an existing workspace that you want to link the token to and create a new database token for the selected workspace and for the authorized user.
Database tokens provide similar functionality to login credentials, but they provide additional security and flexibility. A token, like your username and password, should be kept secure and handled with the utmost confidentiality.
We will use the database token to access the endpoints provided in the database documentation. It’s only possible to use the endpoints if the database token has read, create, or update permissions.
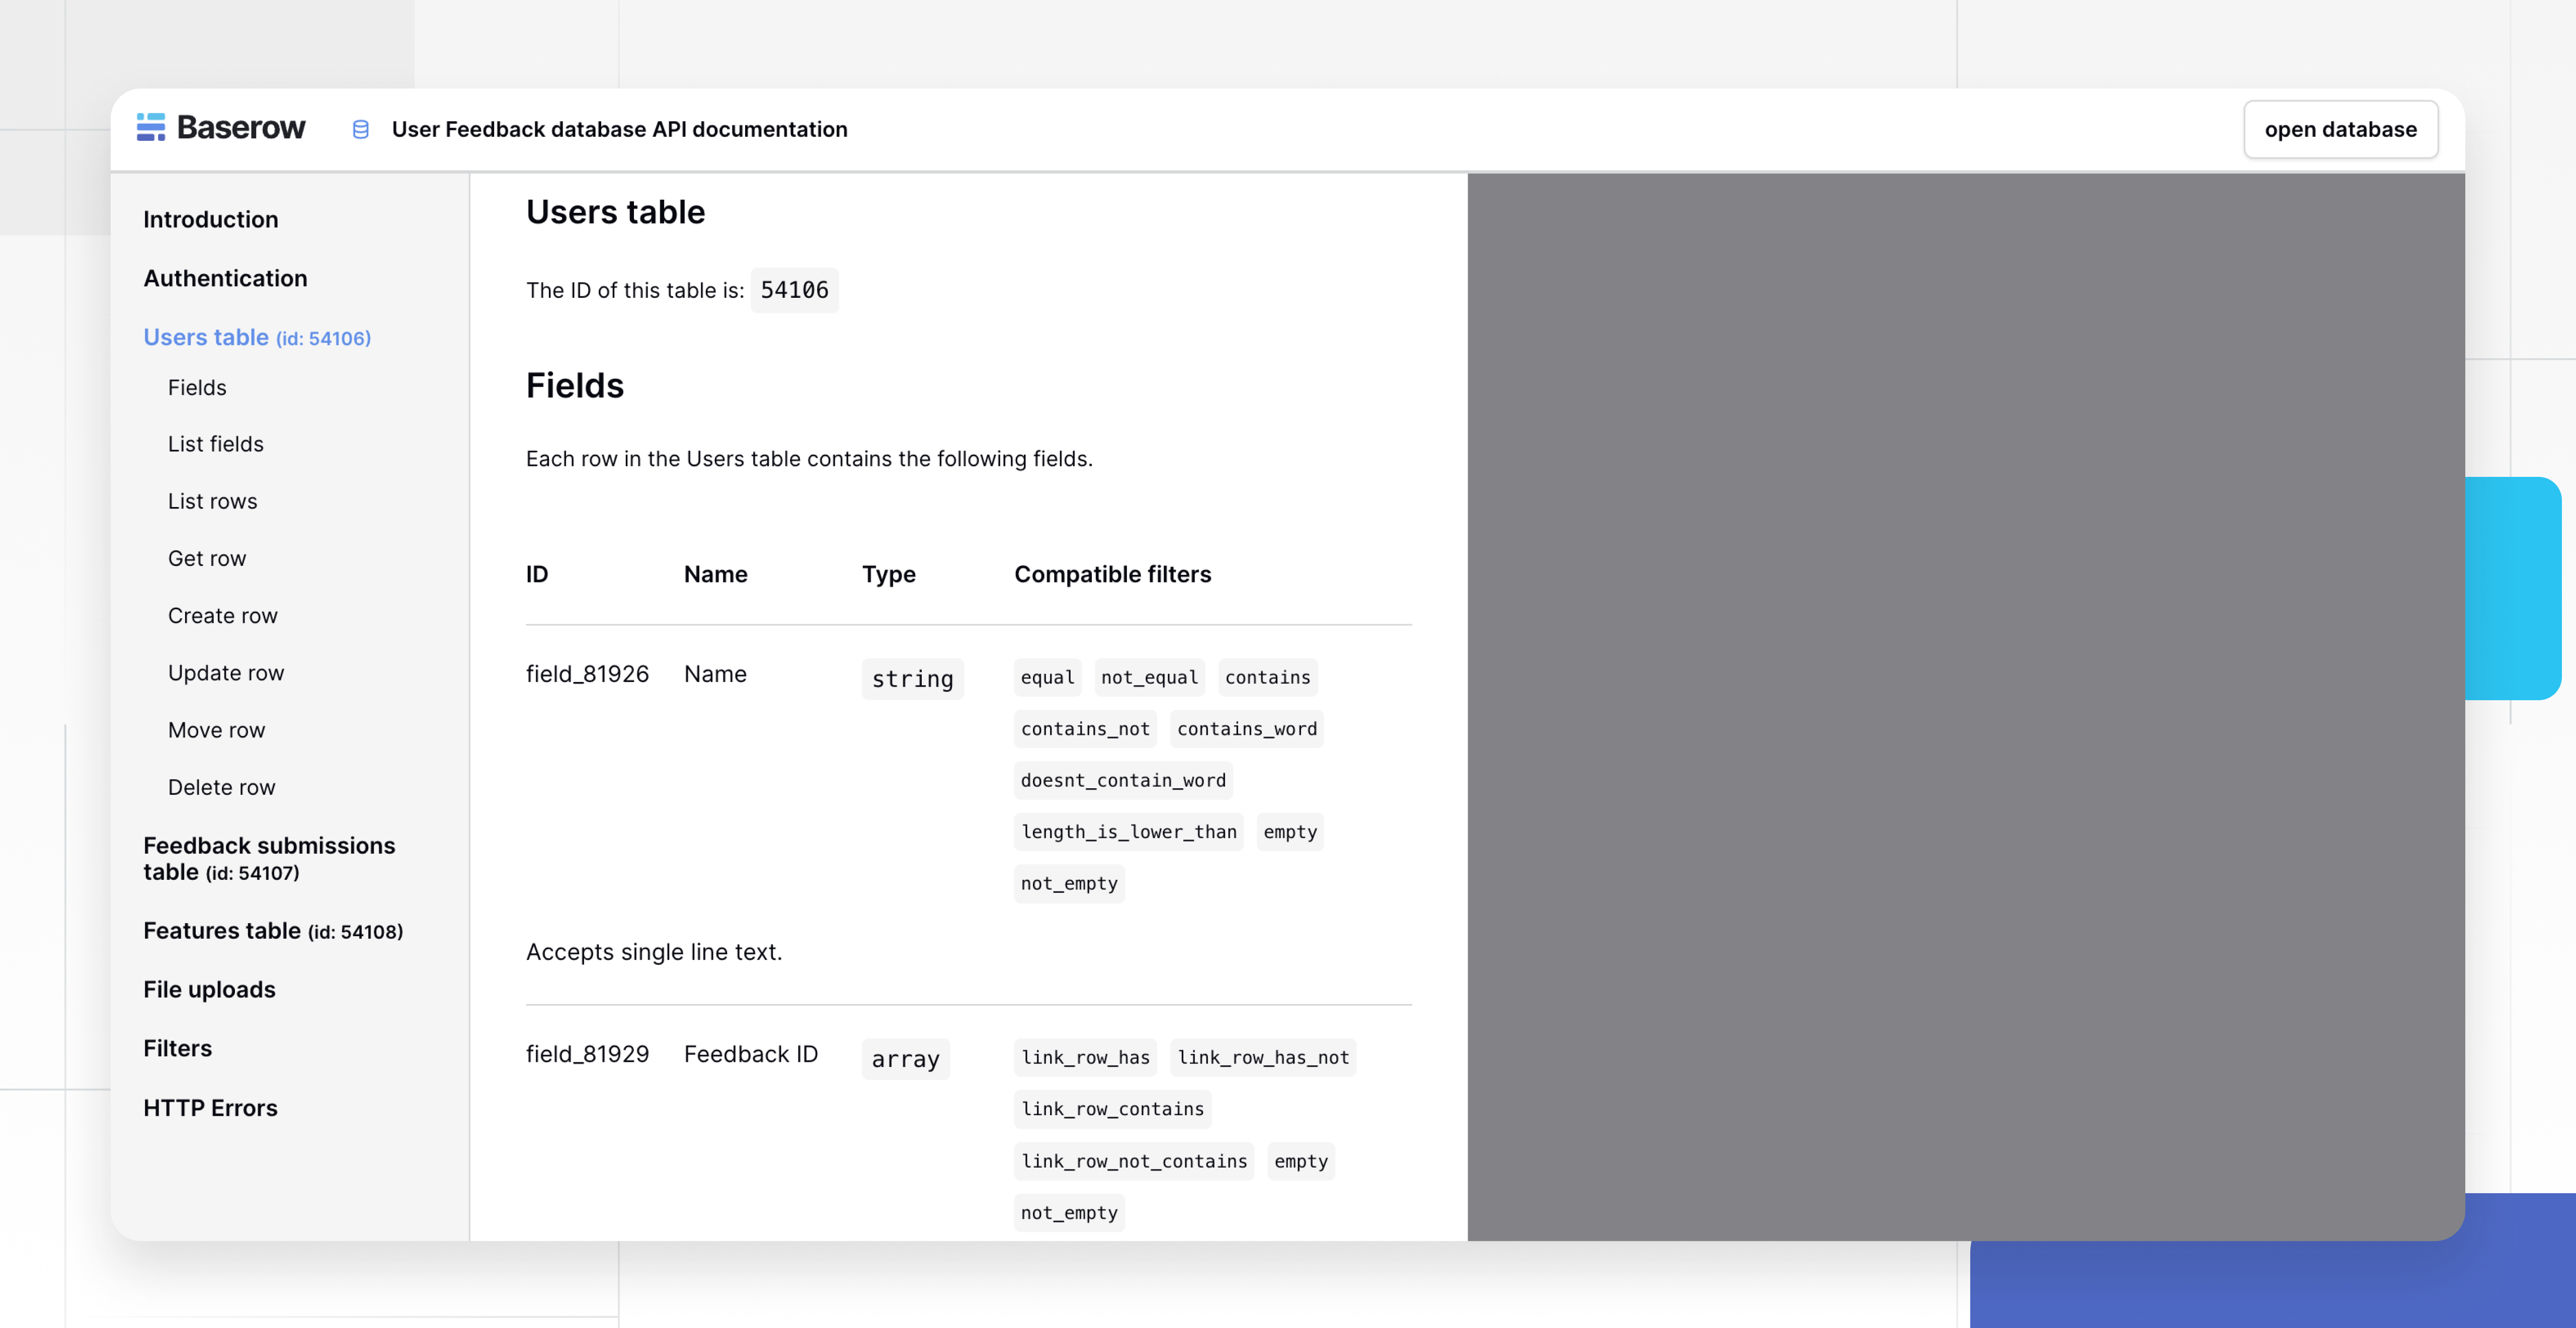
3. Reference the database API documentation
The rules and functions to follow in order to make an API call are laid out in the database documentation. Understanding this will help efficiently manage data retrieval and manipulations through the API.
REST APIs are core operational tools that enable organizations and developers to consume and build on top of Baserow’s various database capabilities. Baserow’s API follows REST semantics, uses JSON to encode objects, and relies on standard HTTP codes, and machine and human-readable errors to signal operation outcomes.
To access the database API documentation → Click on the vertical ellipsis ⋮ beside the database → Select View API Docs from the menu.
The database API consists of different endpoints for specific actions. The endpoints can be found in the left sidebar.
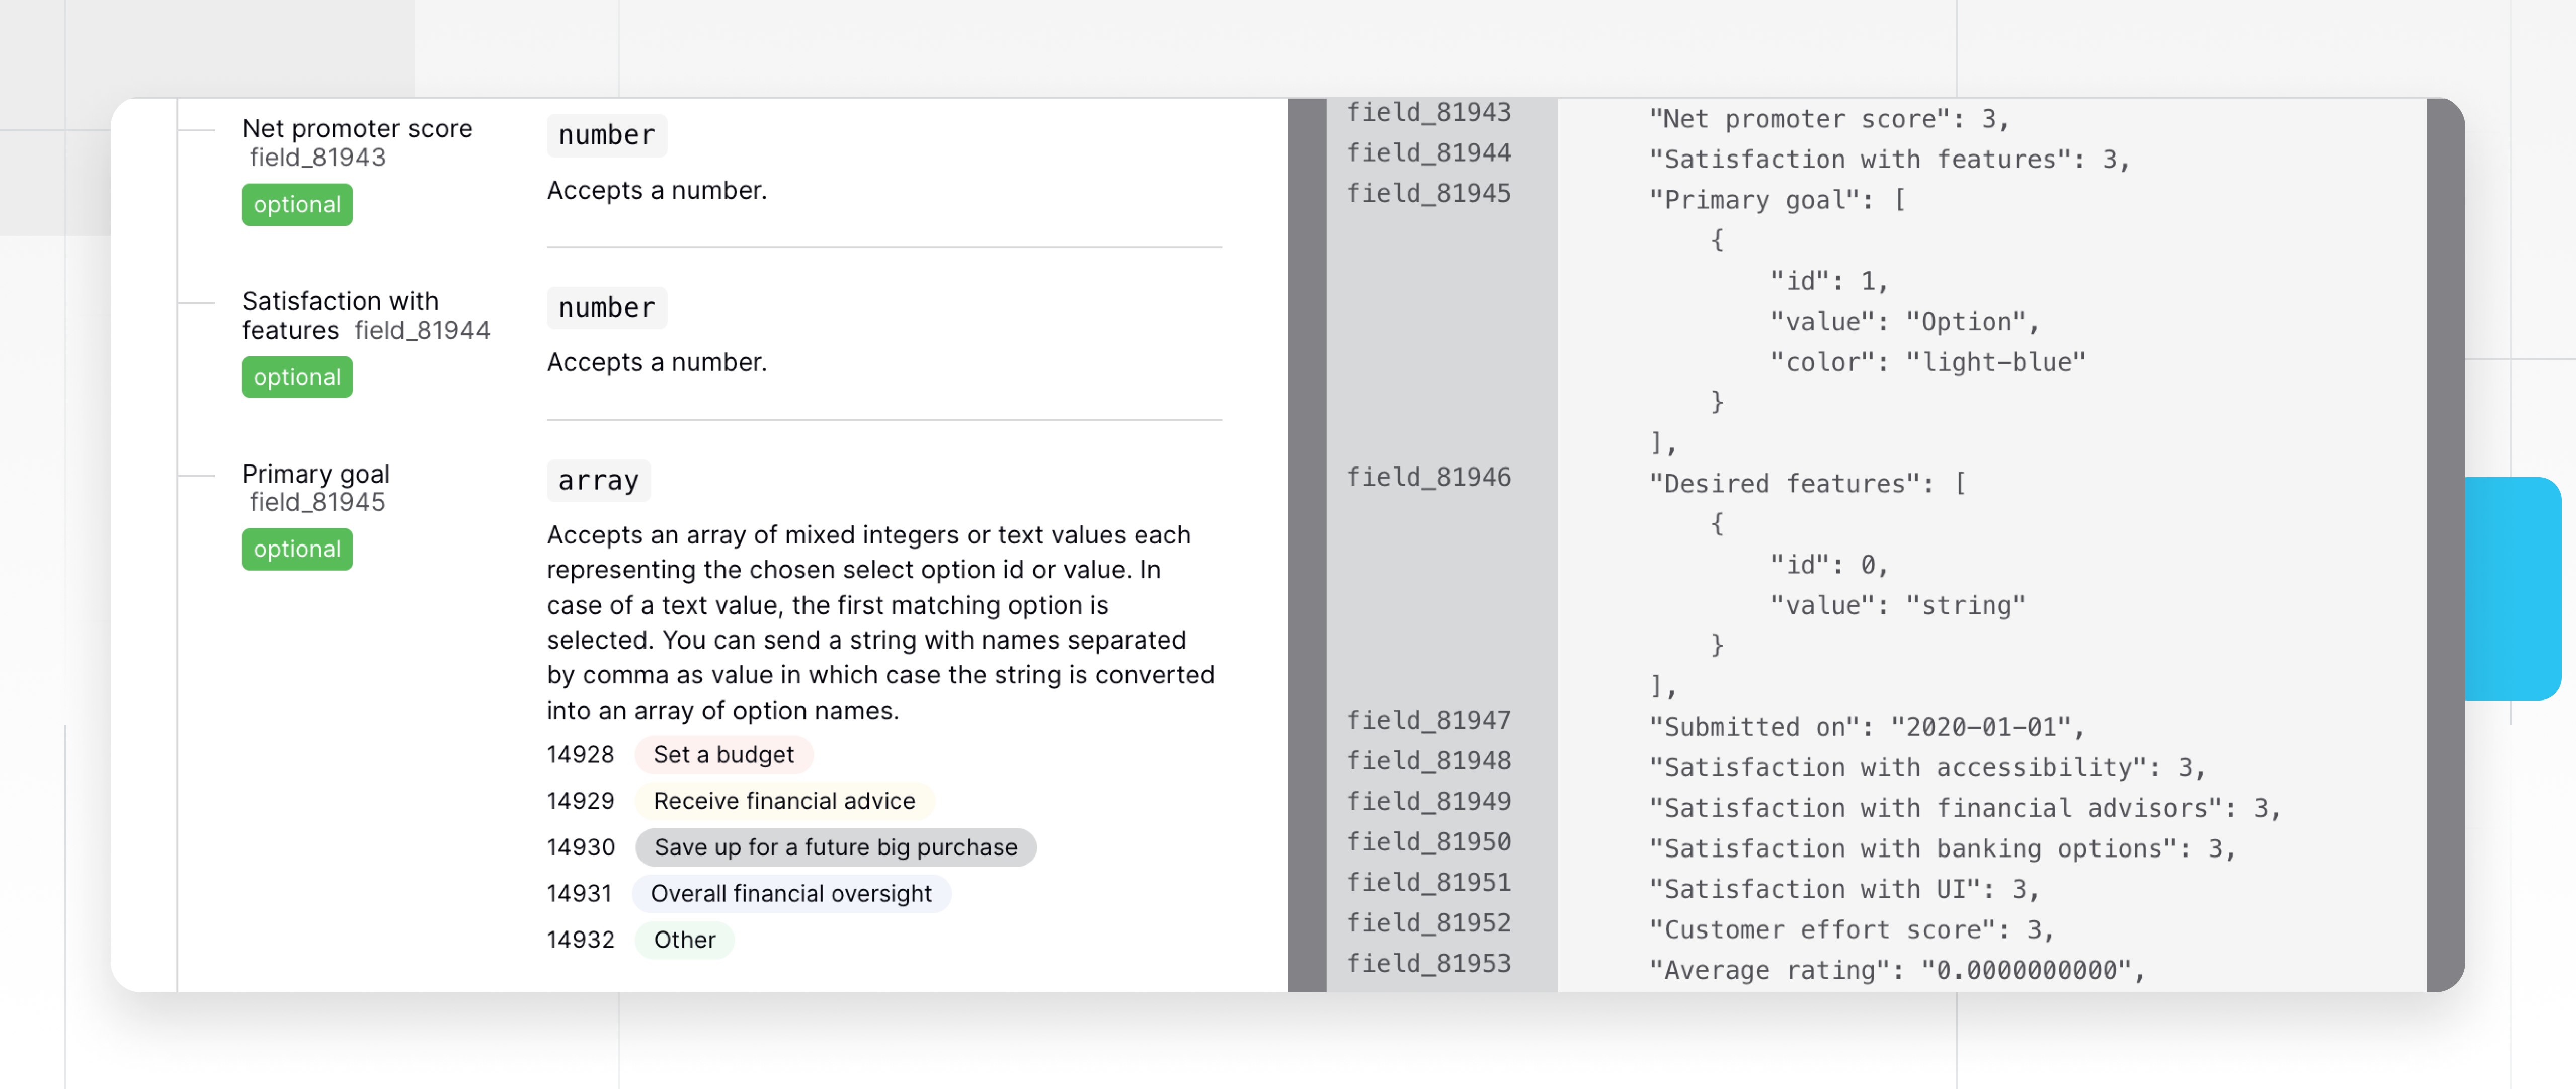
4. Understand Baserow format for a multiple select field
Next, we want to understand how to create new rows that also fill out the multiple select field.
To create rows in the Feedback submissions table a POST request has to be made to the Feedback submissions endpoint.
When using a multiple select field in Baserow, it’s important to understand how it handles the data it receives.
- Accepts an array of mixed integers or text values: The multiple select field can receive input in two formats:
- Integers: Each integer corresponds to the ID of a select option.
- Text values: These represent the names of the select options.
- In case of a text value, the first matching option is selected: If you provide a text value instead of an integer, Baserow will try to match it with the names of the select options. If it finds a match, it will select that option. If there are multiple options with the same name, it will select the first one it encounters.
- You can send a string with names separated by commas as a value: This means that you can provide a comma-separated list of option names as a string. Baserow will then convert this string into an array of option names. For example, if you have select options “Option 1”, “Option 2”, and “Option 3”, and you provide the string “Option 1, Option 3”, Baserow will interpret it as selecting “Option 1” and “Option 3”.
5. Build the scenario in Make
These steps will involve two modules:
- Trigger Module: This depends on where your data originates. It could be a webhook receiving data, another Baserow table containing options, or any other module that provides the data for your multi-select field.
- Baserow - Create row or Update row: This module will write the data to your Baserow table.
To get started, create a new Make account or log into your existing account. Then create a scenario and add modules to the scenario.
- Select the app that will trigger your scenario. Click the first
+button and select Webhook as the trigger app. - Choose one of the triggers from the list. In this case, we’ll select the Custom webhook trigger.
- Configure the module.
- Click OK to save this module and Run once to test the connection.
Results of the scenario run with array:
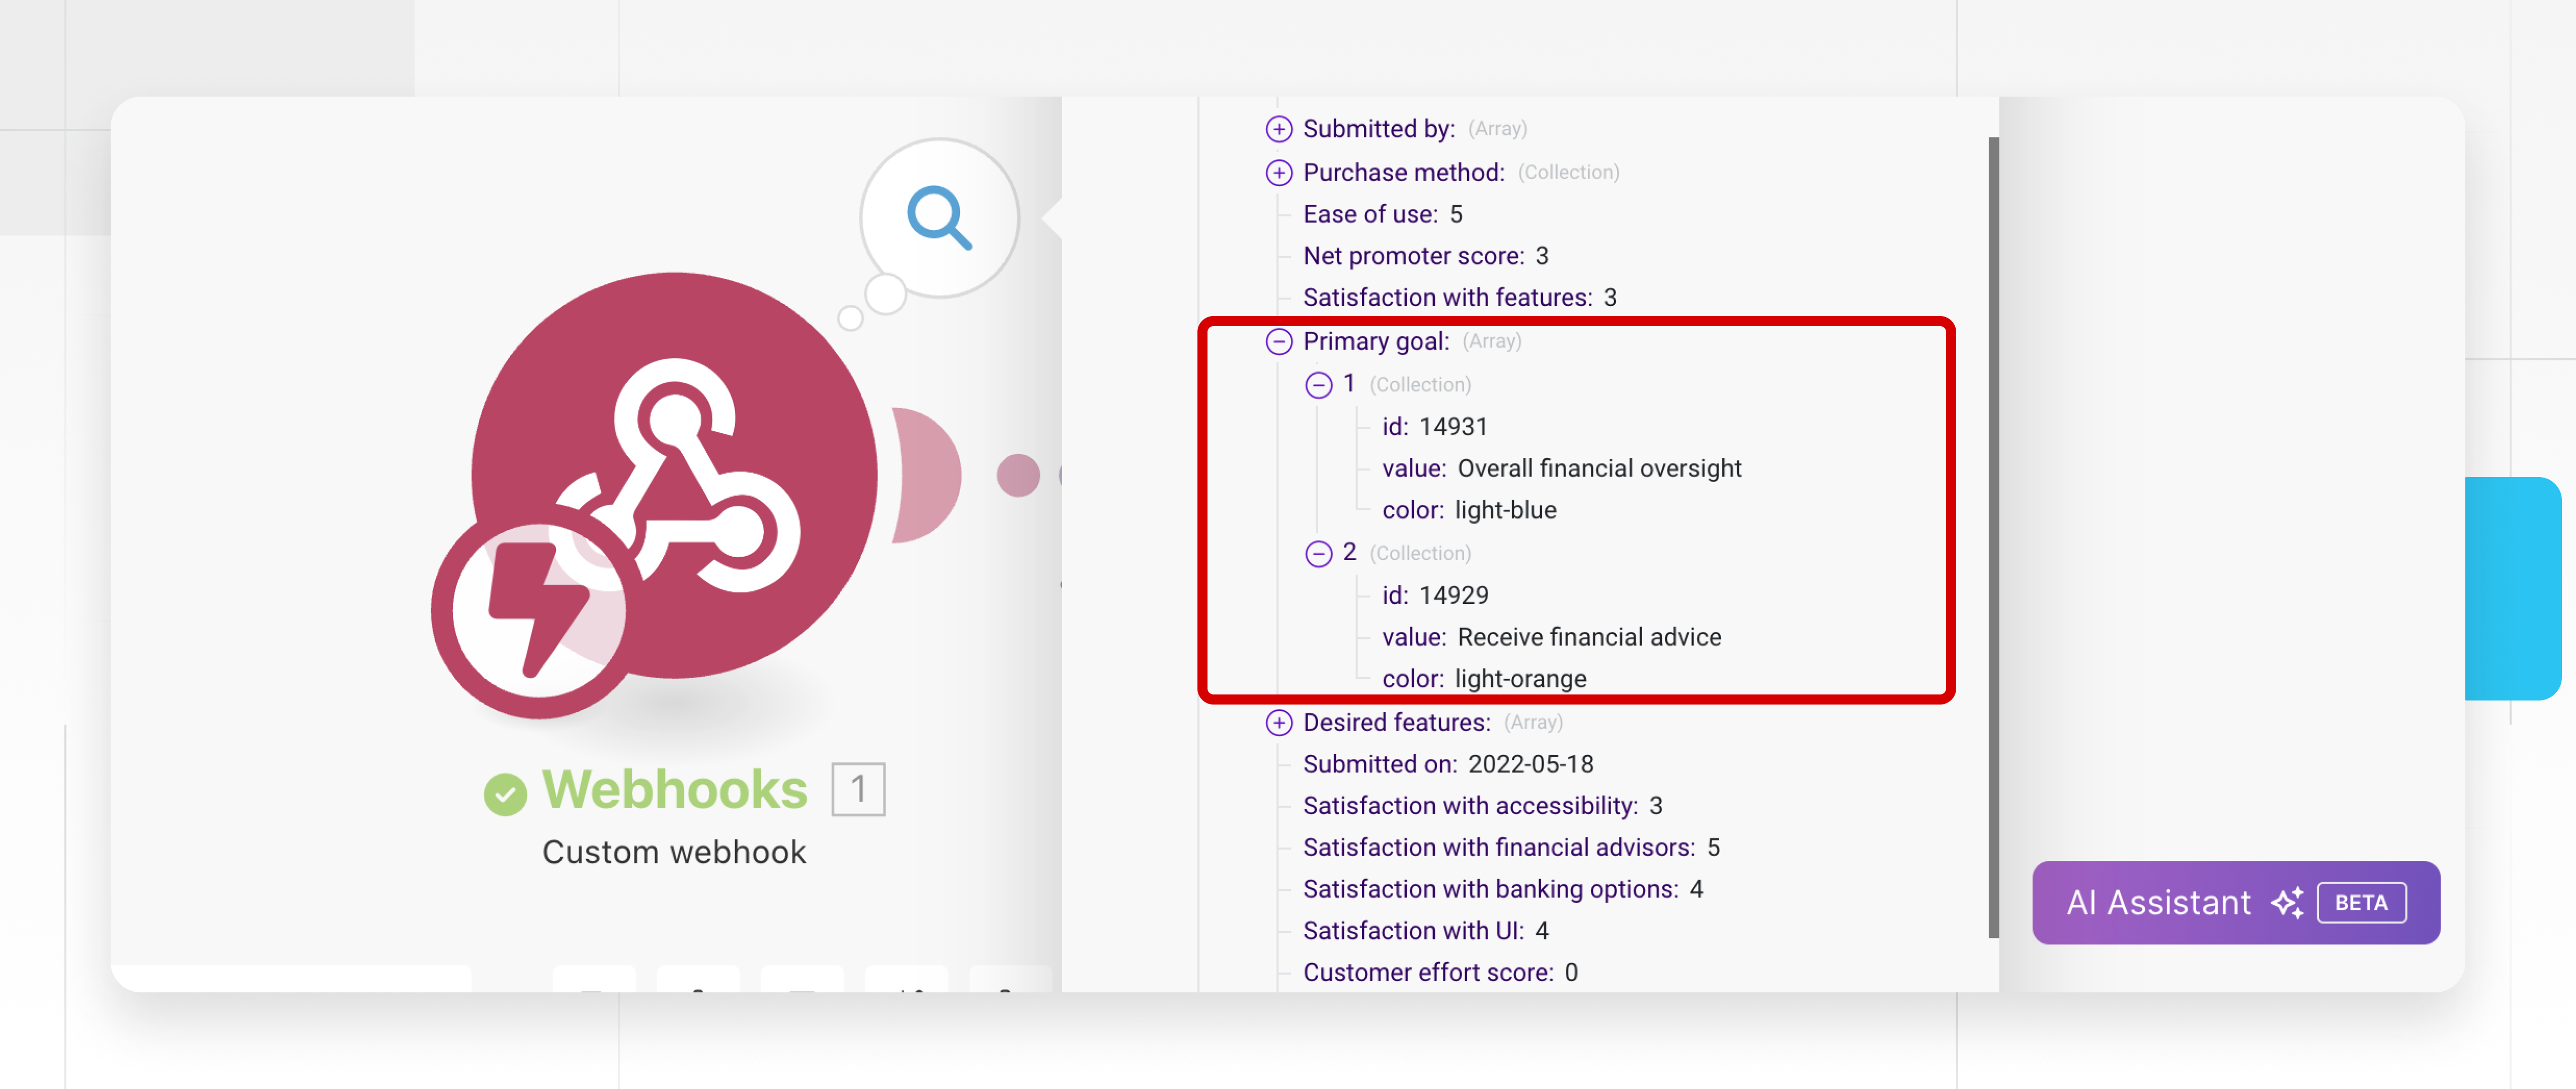
Now, let’s view the data in our Baserow table.
6. Add Baserow module to create new rows
We want Baserow to recognize the multiple select values that matches the select options.
- Click the
+button and select Baserow as the action app. - Choose one of the actions from the list. In this case, select the Create rows action.
- Create a connection or select a previously configured connection from the dropdown options. To create a new connection:
- Enter your Baserow API URL. Find your Baserow API URL in your API documentation. If you are using SaaS version baserow.io, the default URL is
https://api.baserow.io, otherwise, replace the URL with your self-hosted URL. - Enter your Database token. Find your Database Token in Account → Settings → Database tokens as directed above.
- Enter your Baserow API URL. Find your Baserow API URL in your API documentation. If you are using SaaS version baserow.io, the default URL is
- Enter the table ID of the existing table to update. Find the Table ID by clicking on the three dots next to the table. It’s the number between brackets.
- In the “Create row” module, map the corresponding fields from Baserow directly to the multi-select field.
Now let’s map the multiple select field.
7. Use array functions in Make to transform array data
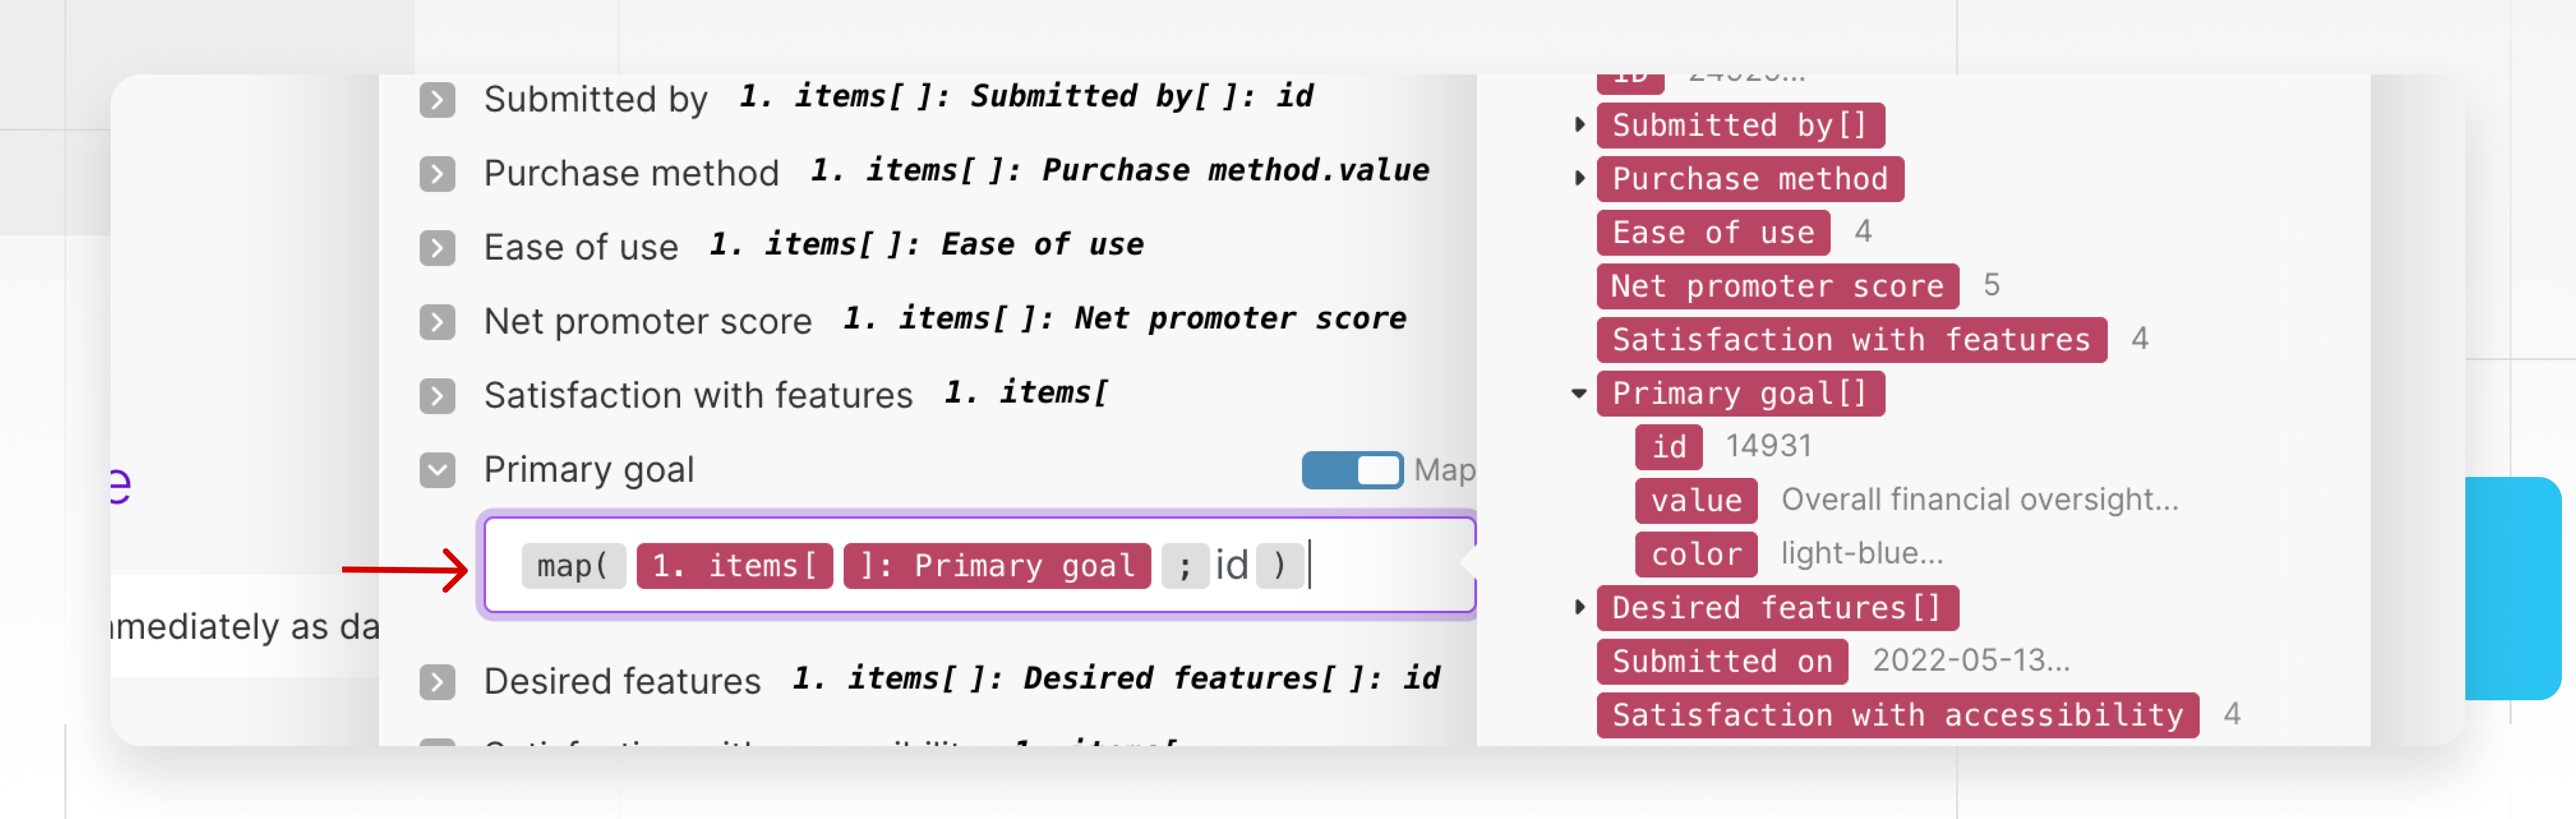
In the step above, we covered how to format the multiple select field input. Now we need to select the option id or values from the array.
To do this, we will use the map() function in Make to write back to Baserow.
Map () returns a primitive array containing values of a complex array and allows filtering values:
(complex array; key;[key for filtering];[possible values for filtering separated by a comma])
map( Emails[] ; email ) = Returns a primitive array with emails.
map( Emails[] ; email ; label ; work,home ) = Returns a primitive array with emails that have a label equal to work or home.
Use raw variable names for keys:
Click OK to save this module and Run once to test the connection.
8. Test and schedule the Make scenario
Our scenario is set up and ready to activate, but we may still need to run a quick test. Run the scenario, Make will load the prompt and store the data in the Baserow database.
Jump back into Baserow and check the Baserow table for the responses!
Specify when and how frequently an activated scenario runs. To do so, go to the scenario detail page and locate the Schedule tab or click on the clock icon to set a preferred schedule.
To set the schedule, adjust the Run scenario to set the time when it should run.
Save and activate the scenario by toggling on the scheduling switch at the bottom left corner.
Summary
This tutorial shows you how to populate a multiselect field with predefined values in a Baserow table using Make. By following this step-by-step process, you’ll be able to integrate your data to Baserow automatically. Whether you’re managing tasks, tracking projects, or organizing data, this tutorial will help you harness the power of automation to save time and boost productivity in your Baserow workflow.
Other useful resources
The following articles may also be helpful:
- How to link Baserow rows in bulk automatically
- How to model your Baserow data
- Automate custom notifications from Baserow form submissions with Zapier Webhook
In case you’ve run into an issue while following this tutorial, feel free to reach out to ask for help in the Baserow community.


